
Views: 0 Author: Site Editor Publish Time: 2025-07-23 Origin: Site


You can make your bathroom mirror look amazing with a few easy materials and some creativity. Framing a bathroom mirror by yourself is a simple diy project. It can help you save a lot of money instead of buying a mirror that is already framed. Many people use cheap materials for a diy bathroom mirror frame. This helps you update your mirror without spending too much. This tutorial will teach you how to frame a bathroom mirror, even if you have never done something like this before. If you want to learn how to frame your bathroom mirror or make a diy mirror frame, you are in the right place. No matter if you have a led mirror, vanity wall mirror, or a bathroom mirror with lights, this tutorial will help you get a new, modern look.
Pick materials that do not get damaged by water, like aluminum or PVC, for your bathroom mirror frame. This helps the frame last long and look modern. Measure your mirror and the space around it very carefully. Remember to check for lights or clips near the mirror. This helps you make sure the frame will fit just right. Cut the frame pieces very carefully with the right tools. Make a rabbet groove so the mirror stays safe inside the frame. Keep your frame safe from water by sealing it. Use mold-resistant primer, paint, or polyurethane varnish. This keeps the frame looking nice for a long time. Stick the frame on with clear silicone adhesive. Use caulk to seal the edges. This makes the frame stay strong and stops water from getting in.

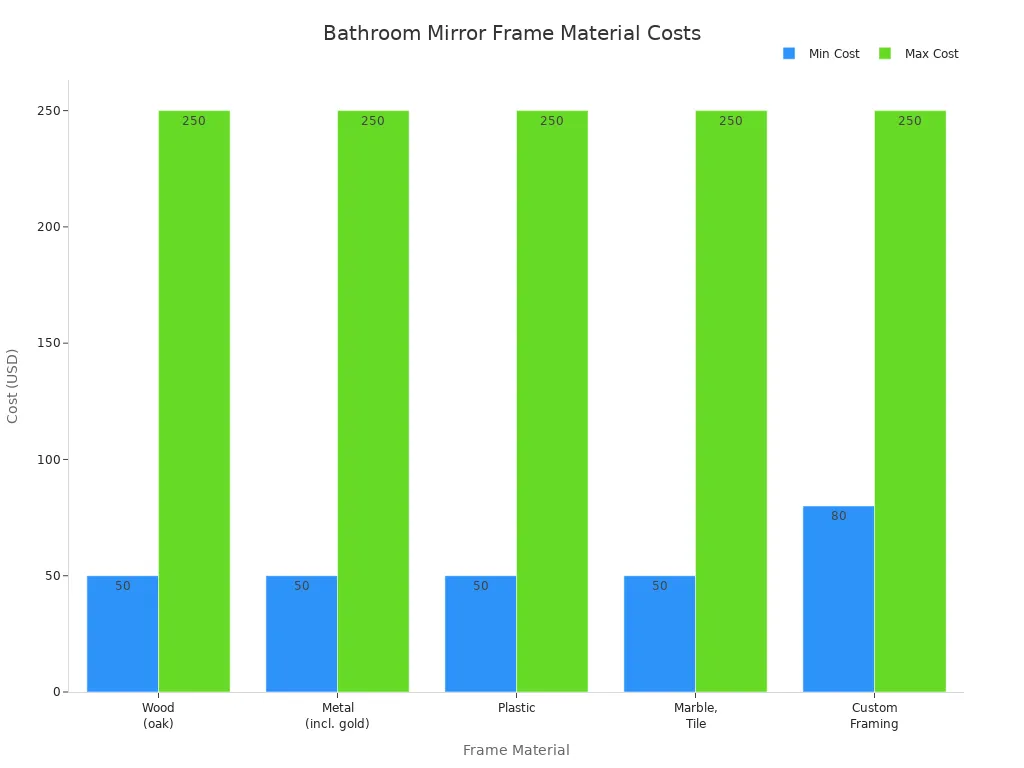
When you want to frame your bathroom mirror, you have many choices. Each material has its own style and good points. Some are better for wet places like bathrooms. Others look special or cost less money. Here are the most common choices:
Material | Characteristics and Considerations |
|---|---|
Stainless Steel | Strong, does not tarnish, light, stays shiny, fits modern styles |
Glass | Looks smooth, shiny, reflects, needs careful cleaning, can break easily |
Wood | Feels warm, classic, can paint or stain, not good with water |
Polished Stone | Looks fancy and shiny, heavy, needs strong support |
Bronze | Does not rust, looks nice, good for old-fashioned styles |
Plastic | Cheap, can be used many ways, not very strong |
Aluminum | Strong, does not rust, looks modern, lasts long in bathrooms |
Acrylic | Light, colorful, easy to shape, does not get damaged by water |
Aluminum and stainless steel frames are used a lot for led mirrors and bathroom mirrors with lights. They do not get ruined by water and keep looking nice for a long time.
Let’s see how these materials work in real bathrooms. Bathrooms get wet and steamy, so you need a frame that can handle it.
Aspect | Aluminum Frames | Wood Frames |
|---|---|---|
Moisture Resistance | Great, never bends or swells | Can bend or get ruined by water |
Maintenance | Easy, no extra work needed | Needs sealing or varnish to last |
Durability in Humidity | Very good, does not rust or get bugs | Not as strong, needs more care |
Style | Modern, shiny, matches silver things | Warm, classic, many stain choices |
Cost | Costs more at first, lasts longer | Cheaper, but needs more care |
Tip: If you want a frame that lasts a long time, aluminum is a good choice for your vanity wall mirror or bathroom mirror with lights. Wood looks nice, but you must seal it to keep it safe from water.
If you care about the planet, pick frames made from recycled metals or wood that is safe for the environment. Guangdong Fiesono Tech Co., Ltd. makes bathroom mirror cabinets and LED cabinet lights with eco-friendly materials and energy-saving designs. Picking the right frame material makes your bathroom look nice and last longer. It also helps make your home greener.
Getting the right measurements is the first step in any tutorial about how to frame a bathroom mirror. You want your new frame to fit perfectly, especially if you plan to frame a builder-grade bathroom mirror. Start by grabbing a tape measure. Measure the width and height of your bathroom mirror. Always measure more than once to make sure you get the same numbers each time. This helps you avoid mistakes.
Think about the size of your vanity. The mirror should be a little wider than the sink but not wider than the vanity itself. Leave about 1-2 inches of space on each side for balance. If you want to frame out that builder basic bathroom mirror, remember to add the width of the frame material to your measurements. This is important for a clean look.
Check the height, too. Most people like the mirror to be at least two-thirds the height of the vanity. Place the bottom edge of the mirror about 4 to 10 inches above the countertop. This makes it easy for everyone to use. If you have a led mirror or a bathroom mirror with lights, measure the space around any lighting fixtures. This keeps your frame from blocking the lights.
Tip: If you feel unsure, ask a professional for help. They can make sure your measurements are safe and accurate.
When you frame a builder-grade bathroom mirror, you might see plastic clips or metal brackets holding it up. These clips can get in the way if you do not plan ahead. For anyone searching how to frame a mirror with clips or how to frame a mirror over plastic clips, here’s what you need to know.
Check the type and size of the clips. Some frames fit right over them, while others need a notch or groove cut out.
Make sure your frame does not press too hard on the clips. This can crack the mirror.
If you have lighting fixtures or outlets near the mirror, measure the distance from the edge of the mirror to these obstacles. This helps you avoid blocking them with your new frame.
Use moisture-resistant materials, especially in bathrooms. This keeps your frame looking good for years.
If you want to add extra style, consider a vanity wall mirror or a bathroom mirror cabinet from Guangdong Fiesono Tech Co., Ltd. Their products work well with custom frames and offer options like LED cabinet light for extra brightness.
Note: Always double-check your measurements and plan for every obstacle. This makes framing a bathroom mirror much easier and gives you a professional result.
You’re ready to start building your diy bathroom mirror frame. First, gather your frame material and measure twice before you cut. For the best results, use the right tools:
Sliding saw: This helps you make perfect 45-degree miter cuts for the corners.
Shooting board with a shooting plane: Use these to fine-tune your miter joints so they fit tightly.
Shaper: This tool shapes the edges of your frame pieces for a smooth, professional look.
Always wear safety glasses and gloves when cutting. These protect your eyes and hands from sharp edges or slips. If you’re working with glass, use a clean, stable surface and never try to catch falling pieces. Take your time and focus on accuracy. A clean cut makes your diy mirror frame look like it came from a high-end store.
A rabbet groove is a small notch on the back of each frame piece. This groove lets your mirror sit snugly inside the frame. Set your router to cut a groove about 1/2 inch deep. This size works well for most mirrors and keeps everything secure. Make sure you check the thickness of your mirror before you start. If you use a bathroom mirror with lights or a vanity wall mirror, double-check the depth so the frame fits around any extra features.
Tip: Always test your groove on a scrap piece first. This helps you avoid mistakes on your real frame.
Before you glue or screw anything together, lay your cut frame pieces around the mirror. Check for a tight fit with about 1 inch of frame overhang on each side. If you see gaps, adjust your cuts. You can use a pocket screw jig to drill holes and join the corners for a stronger fit. Sand the frame with a random orbital sander, then finish by hand, always sanding with the wood grain. After sanding, place the mirror on the back of the frame and trace its edges. This step helps you line everything up during final assembly.
If you want a frame that matches your bathroom mirror cabinet or led mirror, Guangdong Fiesono Tech Co., Ltd. offers many options that work well with custom frames. Their products make it easy to upgrade your space with style and function.
Now comes the fun part—making your frame look amazing! You can paint or stain your bathroom mirror frame to match your style. If you want a modern look, try acrylic paint. Acrylic paints dry fast and stand up well to bathroom humidity. They also resist yellowing and mold, which is perfect for a space that gets steamy. For extra protection, pick a high-gloss or semi-gloss finish. These finishes act like a shield, keeping water away and making it easy to wipe clean.
If you love the natural look of wood, stain your frame first. After staining, add a clear satin polyurethane coat. This clear coat locks out moisture and keeps your frame looking fresh. Many people in this tutorial also paint the back of the frame black. This simple trick stops unwanted reflections in the mirror and gives your project a professional touch.
Tip: Always use a mold-resistant primer before painting. This helps the paint stick and keeps your frame safe from peeling or bubbling.
Bathrooms get wet, so sealing your frame is a must. Polyurethane varnish is a top choice for wood frames. Water-based polyurethane works great and does not turn yellow over time. It creates a tough, waterproof layer that protects your frame from splashes and steam. You can also use trusted wood sealers like Thompson’s Water Seal or Rainguard Premium Wood Sealer. These products guard against mold, mildew, and water damage.
After sealing, let your frame dry completely before installing it around your led mirror or vanity wall mirror. Good sealing means your bathroom mirror with lights will stay beautiful for years. To keep your frame looking its best, dust it with a soft cloth and avoid harsh cleaners. Make sure your bathroom has good airflow and wipe away any water after showers.
If you want more ideas, check out the bathroom mirror cabinets and led mirrors from Guangdong Fiesono Tech Co., Ltd. Their products work well with custom frames and offer extra features for your bathroom.
You’ve measured, cut, and finished your diy bathroom mirror frame. Now it’s time to attach it to your bathroom mirror. These instructions will help you get a secure, long-lasting result.
Clean the Mirror Surface
Wipe down the mirror with glass cleaner. Remove dust, oils, or any old adhesive. A clean surface helps the frame stick better.
Dry Fit the Frame
Place the frame pieces around the mirror without adhesive. Check for gaps or uneven spots. Adjust if needed. This step ensures your framed mirror looks straight and professional.
Choose the Right Adhesive
For most bathroom mirrors, clear silicone adhesive works best. It’s waterproof, flexible, and holds up in humid bathrooms. Urethane adhesives are also strong and easy to use for small jobs. Avoid regular construction adhesives, as they can damage the mirror backing.
Apply the Adhesive
Run a thin bead of clear silicone along the back of each frame piece. Keep the adhesive near the outer edge to prevent it from showing in the reflection. If you’re using a wooden frame, leave a small gap for wood movement. This prevents stress and cracking over time.
Attach the Frame to the Mirror
Press each frame piece onto the mirror. Hold it in place for a few seconds. Use painter’s tape to secure the frame while the adhesive cures. Follow the instructions on the adhesive packaging for drying time—usually 24 hours.
Fastener Options for Extra Support
If you want extra strength, especially for heavy frames, you can use cabinet screws or structural screws. Always anchor into wall studs for the best hold. For drywall, toggle bolts or French cleats work well. These fasteners keep your framed mirror secure and safe.
Tip: Always check the weight rating of your fasteners and adhesives. Distribute the weight evenly to avoid stress on any one point.
Many builder-grade bathroom mirrors use clips to stay on the wall. These can get in the way when you follow instructions for how to frame your bathroom mirror. Here are some tips for framing your bathroom mirror when clips are present:
Inspect and Upgrade Clips
Make sure the clips are tight and in good shape. Replace any that look worn. Choose clips that fit your mirror’s thickness for a snug hold.
Work Around the Clips
If your frame is lightweight, like aluminum or PVC, you can notch the back of the frame to fit over the clips. This keeps the frame flush against the mirror. Avoid heavy frames that could stress the clips.
Decorative and Functional Clips
Use spring clips for easy installation or L-shaped clips for larger mirrors. Decorative clips can add style and match your bathroom decor.
Adhesive Support
Use clear silicone caulking to help hold the frame in place without putting pressure on the clips. This method works well for wood frames and mirrors with lights.
Mirror Frame Kits
If you want a fast and easy solution, try a mirror frame kit. These kits let you add a frame without removing the mirror. They come with all the parts and instructions you need. Most people finish the job in under an hour. Kits are perfect for anyone who wants a quick upgrade without special tools.
Note: Lightweight frames and moisture-resistant materials help prevent clip failure. Always match the clip style and finish to your mirror and bathroom for a seamless look.
Sealing your framed mirror keeps it looking great and protects it from moisture. Follow these instructions for a professional finish:
Seal the Edges
Use clear waterproof silicone caulk to seal the crease between the frame and the wall. This stops water from getting behind the frame. Apply a thin, even bead and smooth it with your finger or a caulk tool.
Let the Caulk Cure
Allow the silicone to cure for at least 7 days before exposing it to water. This step is important for long-lasting protection.
Touch Up Paint and Finish
After the caulk dries, check for any spots that need paint touch-ups. Use a sponge roller for a smooth finish. Mask off the mirror glass with painter’s tape before painting. Apply light coats and let each one dry. For wood frames, add a protective top coat to seal the finish.
Clean Up
Remove any stray paint or caulk from the mirror with a Q-tip or glass cleaner. This keeps the edges crisp and clean.
Regular Maintenance
Dust your bathroom mirror and frame with a soft cloth. For wood frames, use a dry or slightly damp cloth and avoid too much moisture. For aluminum or led mirror frames, use mild detergent and dry thoroughly. Regular checks help your framed mirror stay beautiful for years.
Pro Tip: The most time-consuming part is taping off the mirror, but it’s worth it for a clean, professional look.
If you want more inspiration, check out the led mirror and bathroom mirror with lights options from Guangdong Fiesono Tech Co., Ltd. Their products pair well with custom frames and offer modern features for any bathroom. You can also explore their vanity wall mirror and bathroom cabinet categories for a complete bathroom upgrade.
Looking for more tips for framing your bathroom mirror? Always follow the instructions closely, use the right materials, and take your time. With this tutorial, you now know how to frame a bathroom mirror like a pro. Enjoy your new diy bathroom mirror frame and the fresh look it brings to your space!
You just learned how to update the mirror in your bathroom with a simple frame. This project feels easy and gives your space a fresh look. You can use a led mirror or a vanity wall mirror for even more style. Try it yourself and see the difference. If you want more ideas, check out bathroom mirror with lights from Guangdong Fiesono Tech Co., Ltd. Don’t worry if this is your first DIY—just take your time and enjoy the process!
You want a frame that stands up to moisture. Aluminum and PVC work well in bathrooms. Wood looks great but needs sealing. For a modern look, try a led mirror or vanity wall mirror from Guangdong Fiesono Tech Co., Ltd.
Yes! You can frame a bathroom mirror with lights. Just measure carefully around the lights. Make sure the frame does not block any LEDs. Guangdong Fiesono Tech Co., Ltd. offers bathroom mirror with lights that pair perfectly with custom frames.
You need a tape measure, saw, adhesive, and caulk. For a professional finish, use a miter saw for corners. Want an easier option? Try a mirror frame kit. These work well with led mirrors and bathroom mirror cabinets.
Wipe your frame with a soft cloth. Avoid harsh cleaners. For wood frames, use a little furniture polish. Aluminum frames need only mild soap and water. Good airflow in your bathroom helps prevent moisture damage.


